
Fixing a Running Toilet: What's Actually Happening Inside the Tank

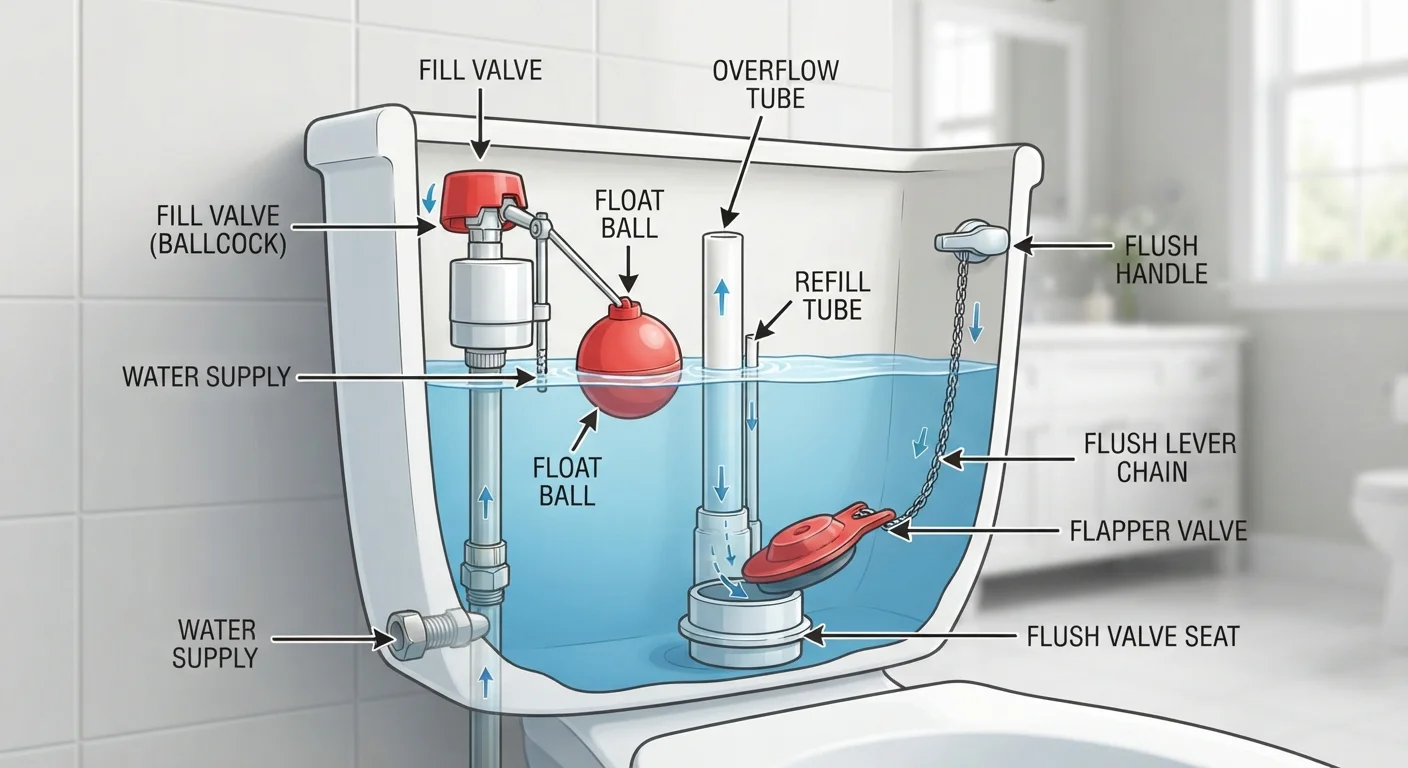
Photo: InsightsTurbo.com | Kickstart Your Knowledge Quest editorial
Key Takeaways
- A running toilet is almost always caused by a faulty flapper, a misadjusted float, or a worn fill valve.
- Most repairs require no special tools and cost very little in parts.
- Fixing a running toilet promptly can save thousands of gallons of water per month.
- Renters should check their lease before making repairs and may need to notify their landlord.
- If water continues running after addressing all three common causes, consult a licensed plumber.
Why Your Toilet Won't Stop Running
That constant hissing or trickling sound coming from your bathroom isn't just annoying - it signals that your toilet is continuously refilling, which can waste up to 200 gallons of water per day. The good news is that the mechanism inside a toilet tank is surprisingly simple, and most running-toilet problems trace back to one of three components: the flapper, the float, or the fill valve.
Before you open the tank, it helps to understand what each part does:
- Flapper: A rubber seal at the bottom of the tank that lifts when you flush, releasing water into the bowl, then drops back to allow the tank to refill.
- Float: A ball or cup that rides on the water surface and tells the fill valve when the tank is full.
- Fill valve (ballcock): The mechanism connected to the water supply line that refills the tank after each flush.
When any one of these fails, water either leaks into the bowl constantly or the tank never registers as full and keeps refilling.
What you will need
Tools and Materials You'll Need
Gather everything before you start so you're not hunting for supplies mid-repair.
Adjustable pliers
Used to loosen and tighten the fill valve lock nut if a replacement is needed.
Replacement flapper
Replaces a worn or warped flapper that is allowing water to leak into the bowl.
Replacement fill valve
Replaces a fill valve that won't shut off even after float adjustment.
Sponge or small cup
Used to remove remaining water from the tank before replacing parts.
Old towels or rags
Placed on the floor to absorb any water that spills during the repair.
Replacement parts are widely available at hardware stores. When buying a replacement flapper, bring the old one along or note your toilet's brand - not all flappers are universal.
Step-by-Step: Diagnosing and Fixing the Problem
Work through the steps below in order. Most people find the culprit by step three.
Remove the tank lid and do a visual inspection
Lift the ceramic lid off the back of the toilet and set it gently on a towel - lids are heavy and break easily. Look inside while the tank is running. Note whether water is:
- Spilling over the top of the overflow tube (the tall open pipe in the center), or
- Leaking quietly down through the flapper at the bottom.
This single observation tells you which component is at fault. Water going over the overflow tube points to a float problem. Water draining through the bottom points to a flapper problem.
Check and replace the flapper
Turn off the water supply by twisting the shut-off valve clockwise until it stops. Flush the toilet to empty the tank, then sponge out any remaining water.
Unhook the flapper from the pegs on either side of the flush valve seat and disconnect the chain from the flush handle arm. Inspect the flapper closely - if it feels stiff, cracked, or coated with mineral buildup, it needs replacing.
Snap the new flapper onto the same pegs and attach the chain with about ½ inch of slack. Too much slack and the flapper won't lift fully; too little and it won't seal properly. Turn the water back on and test.
Adjust the float
If water was spilling into the overflow tube, the float is set too high, causing the tank to overfill. The water level should sit about 1 inch below the top of the overflow tube.
There are two common float types:
- Ball float: A ball on the end of an arm. Bend the arm slightly downward or turn the adjustment screw at the base of the arm counterclockwise to lower the water level.
- Cup float: A cylindrical float that slides up and down the fill valve shaft. Pinch the clip or turn the adjustment screw to slide it downward.
Turn the water back on and wait for the tank to refill. Check that the water stops below the overflow tube.
Replace the fill valve if needed
If you've replaced the flapper and corrected the float, but the toilet is still running, the fill valve itself is likely worn. Replacement fill valves are inexpensive and installation doesn't require soldering or special plumbing skills.
- Turn off the shut-off valve and flush to drain the tank.
- Place a towel under the tank. Disconnect the water supply line from the bottom of the tank.
- Use adjustable pliers to unscrew the lock nut holding the old fill valve in place, then lift it out.
- Insert the new fill valve, following the manufacturer's instructions for setting the height.
- Hand-tighten the lock nut, then give it a quarter-turn with pliers - do not overtighten.
- Reconnect the supply line, turn the water on slowly, and check for leaks around the base of the valve.
Test Before Reassembling
When to Call a Plumber
Most running-toilet repairs are genuinely DIY-friendly, but there are situations where professional help is the right call.
- The toilet continues running after you've replaced the flapper, adjusted the float, and replaced the fill valve.
- You notice cracks in the porcelain tank or bowl.
- Water appears on the floor around the base of the toilet.
- You're a renter whose lease requires landlord approval before plumbing repairs.
Renters: Check Before You Repair
A licensed plumber can diagnose internal supply line issues or worn shut-off valves that aren't visible from inside the tank. Don't delay if water is pooling on the floor - that points to a more serious leak that can damage flooring and subflooring quickly.
The content provided on our blog site traverses numerous categories, offering readers valuable and practical information. Readers can use the editorial team’s research and data to gain more insights into their topics of interest. However, they are requested not to treat the articles as conclusive. The website team cannot be held responsible for differences in data or inaccuracies found across other platforms. Please also note that the site might also miss out on various schemes and offers available that the readers may find more beneficial than the ones we cover.